Pages

Thursday 30 May 2013

Say it with Flowers Blog Hop and MIHO Unexpected Things Giveaway

Welcome to my stop of the Say it with Flowers Blog Hop. First of all I would like to thank Madame Samm at Sew We Quilt for organising this fantastic blog hop and giving me the chance to join. A big thank you also to Carol Swift from Just Let Me Quilt, our cheerleader, for all her help and incredible patience!

For this special event, MIHO UNEXPECTED THINGS is sponsoring my giveaway and, of course it has to do with flowers! Read on to find out more about the giveaway.

For my project I couldn't resist using some beautiful fabric from Moda I had been saving for a special occasion, Papillon by 3 Sisters:


It's a while I've had this project in mind but never got round to making it. Thanks to this blog hop I finally got to work and this is what I came up with - my jewellery holder.


I've hung it up in the walk-in closet and it looks good and is also useful, don't you think? With six pockets, all made with different fabrics from the same Moda collection, it's a special way of tidying up and showing off my favourite jewellery!


Here are some details. I love using linen, it doesn't steal the scene from other fabrics, especially these delicate coloured flowers.


My second flower project is this decoration I made for the front door using Tapestry by Joanna Figueroa, Fig Tree & Co. for Moda. My friend Cinzia Angelina is patiently trying to teach me to crochet. I am very (very) slowly improving!


I am super pleased to have the opportunity of giving away one of MIHO UNEXPECTED THINGS products to a lucky winner. MIHO has in fact offered one of their beautiful (and useful!) boxes especially for the Say it with Flowers Blog Hop.


and this is the box chosen for the giveaway:


Don't you just love it? There are flowers, of course! Please leave a comment to have a chance of winning this stunning box. I will post the prize internationally, anywhere the post office lets me! The lucky winner will receive this flat pack with really simple (and fast) instructions for putting the box together. 


Thank you for visiting and don't forget to leave a comment to have a chance of winning the fantastic MIHO UNEXPECTED THINGS giveaway!

GIVEAWAY CLOSED

Let the flower inspiration flow:
visit all of today's blogs and their host's wonderful projects:

May 30th

Thursday 23 May 2013

MIHO UNEXPECTED THINGS: sponsor giveaway coming up soon!

If you've been reading my posts, you'll already know I'm a huge fan of MIHO UNEXPECTED THINGS, so the fact that they are sponsoring a giveaway I will soon be hosting on this blog makes me super happy!


Yes, the giveaway is going to feature one of their fantastic products. Which one, is a surprise! MIHO produces home collections that range from trophies to birdhouses, 


from stools


 to table linen


 from armchairs


 to rugs


A lot of items come in flat packs that take only seconds to put together (I'm not joking, Ella started putting them together when she was six years old, the instructions are really clear and there are always extra rings!).

An enormous thank you to MIHO UNEXPECTED THINGS for sponsoring the giveaway that's coming very soon. I hope you'll enjoy it too!

Sunday 19 May 2013

Russian Doll Keyring Tutorial

LAST MINUTE:


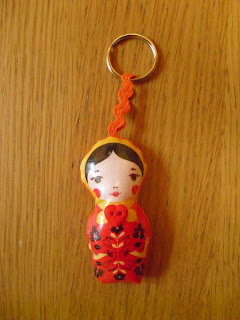
Here's a very pretty keyring made using Little Kukla laminated fabric by Suzy Ultman. You can make keyrings using novelty fabrics with large scale designs. They're simple to make and look great hanging from a school bag too!


Start by cutting out one of the Russian dolls from the fabric, leaving at least 0.5mm around the doll. You don't have to follow the shape at this stage.


Sew a heart shaped button (or other embellishment of your choice) on the laminated fabric.


Choose a matching backing fabric and cut to the same size. Right sides facing, sandwich a length of doubled trim to form a loop and sew around the edge of the doll. Make sure you're not sewing on the white part of the fabric but on the edge of the doll, this will avoid the white showing around the edge of the finished Russian doll. Leave an opening of about 1.5 cm on one side of the body, not too near the corner.


Now you can cut off the extra fabric, following the edge of the doll, leaving just a few millimetres. Snip around the neck to make the result more smooth. Turn the doll right sides out and stuff. Close the opening by hand. Add a ring to the trim to transform your Russian doll into a keyring. I made a few for Ella's end of year school concert to help raise some money, they were fun making!


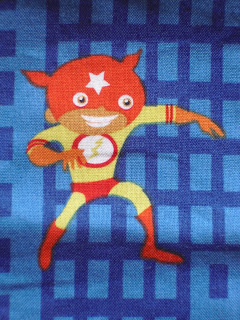
You can easily make a boy's keyring using a suitable novelty fabric:


Linking this tutorial to Flamingo Toes' Think Pink Sunday. There are some very interesting tutorials and a lot of delicious looking recipes!


Say It With Flowers Blog Hop

The Say It With Flowers Blog Hop is coming up fast and I'll be posting on the 30th of May! For details and the schedule visit Carol Swift's blog Just Let Me Quilt. I'm organising a surprise for the occasion too, can't wait to tell you about it... Stay tuned!


Tuesday 14 May 2013

Eline Pellinkhof - Mural cross stitching and fabric

In one of my recent posts I spoke about Eline Pellinkhof. I think at the moment she's most famous for her giant cross stitching murals. This is my favourite:


but you've probably already seen this one:


I have one of her books "Stitch and Sew Home" and it is sooo beautiful, you just keep turning the pages and looking at all the projects beacause you don't know where to start! So many ideas (some from her friends) and the photography is really good. She has other books out too but they haven't been translated in English yet.


I am definitely adding to my Wish (I could buy) List her "Eline's House fabric":


I really like the vintage version, but couldn't find a better photo than this one I took from a page of Mollie Makes (issue n. 19):


It's a panel 100 x 140 cm, with different patterns on the same metre of fabric, giving you lots of possibilities for small projects buying only one metre of fabric. I've read on her blog she's working on some new fabric too. Looking forward to see what see comes up with next.

Saturday 11 May 2013

To Boston With Love - bunting flag on its way!

Our bunting flag is on it's way to Boston to participate in the Vancouver Modern Quilt Guild's To Boston With Love project . Let's hope it gets there in time!


The flags will be exhibited by The Museum of Fine Arts, Boston from May 23 to June 16, 2013. I'm curious to see what the installation is going to look like. I'm also wondering exactly how many flags will be flying in the Museum's courtyard!

 TBWL.venueannouncement


Don't miss the To Boston with Love Flickr group because there are so many brilliant flags to see, all so very different. The group is practically an encyclopedia for patchwork techniques!


With all our love and hope for Boston.


P.S. The photos of our flag were all taken by Daniele Di Ciccio.

Monday 6 May 2013

Sew,Mama,Sew! GIVEAWAY DAY!

Non perdetevi questa settimana (non dura solo un giorno!) sul blog Sew, Mama, Sew! Fantastici premi da vincere e moltissimi blog interessanti da scoprire! Andate subito a vedere... da non perdere!


Sunday 5 May 2013

Girl's pinafore (apron?) - Suzy Ultman's laminated Little Kukla

I've finished my first girl's pinafore using Suzy Ultman's laminated (or slicker) fabric called Little Kukla and I'm surprised how well it turned out. It's the right size for a 3 to 5 year old and very useful for messy cooks or growing artists! Just wipe over to clean!


Can somebody please explain to me the difference between pinafore and apron. I grew up in the UK and my Grandma and Mum taught me that a pinafore is the garment with the bit that covers your chest too. An apron is the garment that just covers you from the waist down. Now I searched for photos of aprons in Google and a load of pinafores appeared. Did I misunderstand this difference? Can anybody explain this to me?


This fabric is really jolly and fun too. As I wrote in a previous post, I love Suzy Ultman's fabric and in particular Little Kukla. I have this fabric in laminated and not.


Now I'm working on some key rings made from the same material to sell to raise money at Ella's school "End of Year Concert". They're looking good too, it must be the fabric that makes everything look good! I'll have some photos soon...

Wednesday 1 May 2013

A Lovely Year of Finishes - LoveLy Baby Quilt finished!

I have managed to finish my LoveLy Baby Quilt and I have to say thank you to "A Lovely Year of Finishes" for this. I'm sure I wouldn't have finished it for months if I hadn't had this "deadline". Just in time for the April Finishes Party!


 As I posted half way through the month for the Mid-month Check-in, I had a few problems to solve. The tags I'd added were sticking too far out. I unstitched them, moved them further in and now I like how they look. I unstitiched the heart I'd quilted on one of the solid pink squares and tried again. The hearts are still a bit wobbly but it's handmade, right?


To be honest I still have to iron it, again. I would also like to add Eline Pellinkhof's crochet heart near the middle, but the quilt is finished and I'm happy with how it turned out. I am very very satisfied at having finished my LoveLy Baby Quilt!

My Button