Pages

Monday, 12 October 2015

Handmade Autumn - The Creative Factory

We're enjoying Autumn here, before the Christmas rush starts! Eating chestnuts, walking around local village autumn markets, getting used to the school/sports schedule again! The days are sunny and just a little fresh, perfect Autumn weather. We've even got our Autumn "Bucket List" Mobile out for the season:


We made this mobile last year for a competition. We even won! Here is the post where we explained how the mobile was made.


We love Autumn. OK, we love every season, but there is something cosy about Autumn that makes this time of year so special! We're off to... collect acorns!


This year our friends at The Creative Factory have organised Handmade Autumn and if you'd like to take a look, here are the links to all their projects:


Handmade Autumn by The Creative Factory


Well worth taking a look, there are so many lovely ideas!


Follow on Bloglovin


Saturday, 26 September 2015

Autumn Hoop Pincushion - #igpincushionswap

I breathed a sigh of relief when I saw my swap partner actually got the pincushion I sent her for the #igpincushionswap! I had been worrying the parcel I sent would never arrive and instead it did, safe and sound. As my Hoop Pincushion suits the season (and the weather!) I thought of posting a few photos... My partner likes it and that makes me so happy.


I found a really good tutorial for making hoop pincushions at Bumblebee Linens. Really worth trying! The only variation I made was to cover the back with a felt circle instead of using patterned card stock.


Hoop pincushions are very enjoyable to make and I think they can make a good decoration too (for the front door?) if you hang them up with a ribbon or trim. Definitely going to make another one!


Follow on Bloglovin


Wednesday, 9 September 2015

Back to School Linky Party

The Creative Factory invites you to join Handmade Back to School Linky Party with any projects you have created for Back to School! Join our linky party clicking on the link up button at the end of this post, we would love to see what you have been up to!

The Creative Factory vi invita a partecipare al Handmade Back to School Linky Party con i vostri progetti dedicati al rientro a scuola! Partecipa cliccando sul bottone in fondo a questo post, ci piacerebbe molto vedere che cosa avete creato!


Handmade Back to School Linky Party is organised by The Creative Factory and co-hosted by:

Handmade Back to School Linky Party è organizzato da The Creative Factory ed ospitato da:


Adding your project to the party, it will show on all the above blogs! The linky party ends on the 8th of October, so there is plenty of time to join.

Aggiungendo il tuo progetto al linky party, apparirà su tutti i blog in elenco! Il linky party termina il giorno 8 ottobre quindi c'e' tanto tempo per partecipare.


Monday, 7 September 2015

Back to School Treat Banner - Bandiera Porta Regalo - The Creative Factory

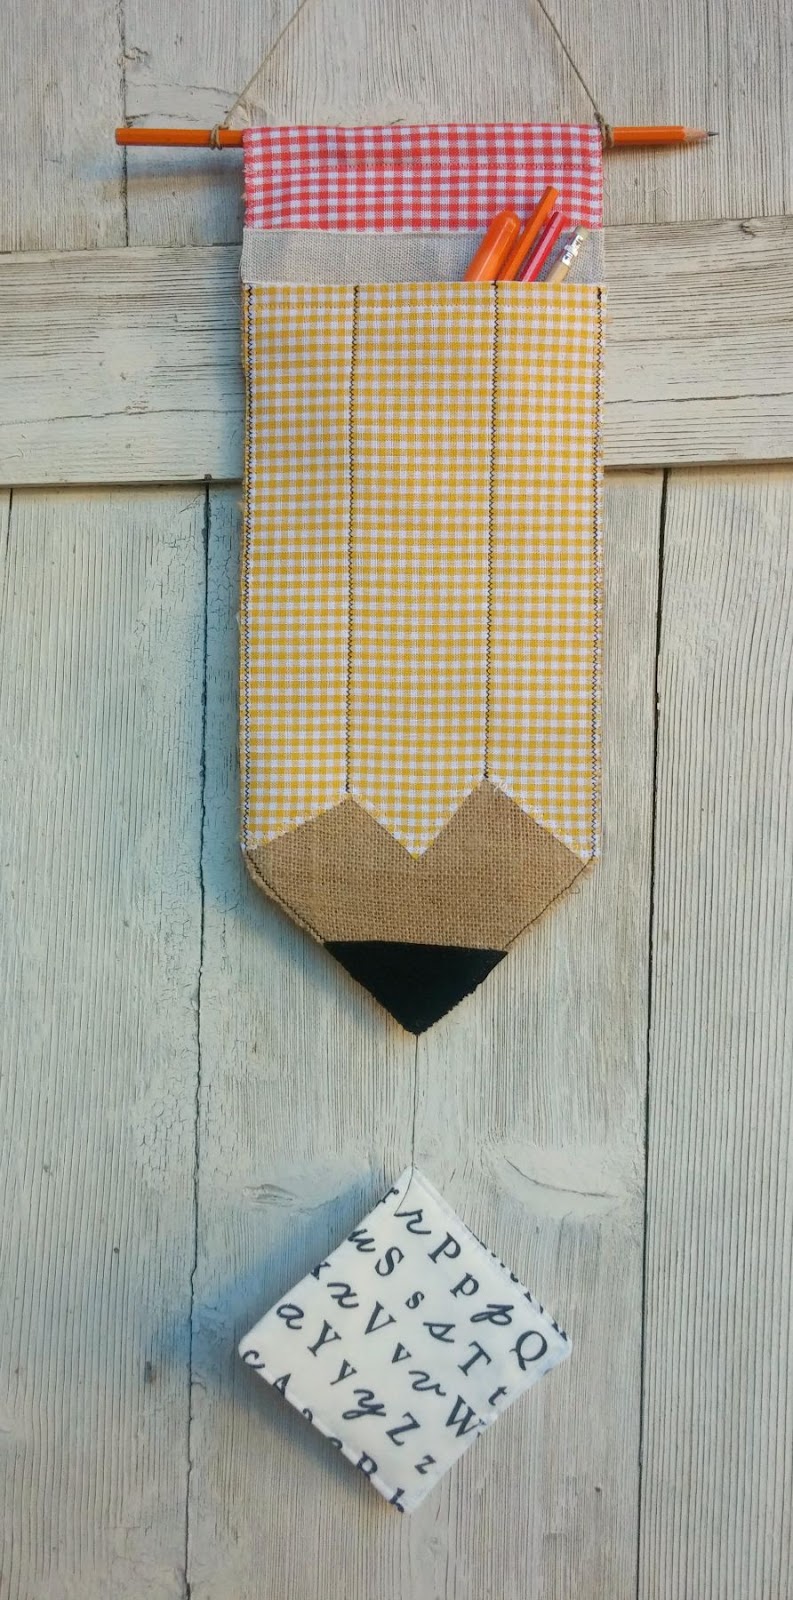
Tuesday is Lucy's first day of Nursery School and she is getting more and more excited! Next week Ella starts school again too so what better way to start the new school year than with a little treat. For the Creative Factory's Back to School series we made a fun banner that is also a pocket to put a little treat inside for the first day of school.

Martedì è il primo giorno di Scuola Materna di Lucy e sta diventando sempre più agitata! La prossima settimana anche Ella ritorna a scuola e allora perchè non iniziare il nuovo anno scolastico con un regalino. Per Back to School di The Creative Factory abbiamo creato una bandiera divertente che è anche una tasca porta regalino per il primo giorno di scuola.


A classic yellow pencil transformed into a banner with burlap, bright gingham and stitched black lines. To hang it up... a pencil. Actually, you must have noticed, there is a trick: we stuck two pencils together to make the right length!

Una classica matita gialla si trasforma in stendardo con tela, allegra stoffa a quadretti e linee nere cucite. Per appenderlo... una matita. Veramente, avrai notato, c'e' il trucco: abbiamo attaccato insieme due matite per creare la lunghezza necessaria!


A "piece of paper" is attached to the banner by a pencil line (a black thread). We used this fun text fabric but it would be nice to embroider/write a message too for your children.

Un "pezzo di carta" è attaccato alla bandiera da una linea di matita (un filo nero). Abbiamo usato una simpatica stoffa con testo ma sarebbe bello anche ricamare/scrivere un messaggio per i tuoi bambini.


Slip a lollipop, a packet of sweets, a pretty pencil or a fun eraser in the banner pocket as a little treat for a happy back to school day!


Infila nella tasca della bandiera un lecca lecca, un pacchetto di caramelle, una bella matita oppure delle gomme carine come regalino per un felice rientro a scuola!


Follow on Bloglovin


There are many fun and useful projects for Back to School by the Creative Factory friends you can read about here:

Ci sono molti progetti divertenti ed utili per Back to School delle amiche di The Creative Factory da leggere qui:

Saturday, 22 August 2015

How to make a Small Project Bag with Minky Handles - Tutorial

Lately I've been carrying a small paper bag around with me in the car when I go to work, hoping to find a few minutes to do some hand sewing. Then I thought: why do I have to carry around this miserable paper bag when I can sew myself a bag that's the right size for little projects. So I got out two lovely The Makers Happy Crafty panels by Cori Dantini and made myself a Small Project Bag with minky handles. Why minky handles? Because they are so soft and comfy to use!

If you'd like to make one yourself, here's an easy tutorial for making a Small Project Bag with minky handles:

Here is what you will need:
  • Two The Makers Happy Crafty panels by Cori Dantini (or two pieces of pretty fabric, size 10.5" x 12" each);
  • Two pieces of fabric size 10.5" x 12" each for the lining;
  • Cotton Batting, two pieces size 10.5" x 12" each
  • Two strips of minky fabric size 2.5" x 18" each
  • Button
  • Coloured hair elastic
  • Embroidery thread and hoop (optional)

All seam allowances are 1/4" unless otherwise stated.


To start (this is optional) embroider details on the panel using embroidery thread and an embroidery hoop. Choose the details you would like to stand out and embroider directly over the lines. There are lots of examples of embroidery stitches on the Internet you can use. Try the tips here at Flamingo Toes, for example.


Make the handles by folding each strip in half, lengthwise, with right sides together. After pinning (or using clips), sew along the long edge. Turn the handle right side out using a turning tool (I use a Clover turning tool but you could use a chop stick because the minky fabric is quite easy to turn).


Now you're ready to make the bag. Lay down one piece of batting, then place the lining fabric on top, right face up. After finding the middle of the top edge of the lining fabric, center one minky handle, facing downwards, with about one inch of the handle overlapping on top (see photo). Make sure the minky handle is lying flat and hasn't turned. Place the fabric panel you are using for the front of the bag face down on top. Pin along the top edge and make sure the handle is pinned in place too. Sew along the top edge of the fabrics, making sure to pass several times backwards and forwards over the handle ends to secure them.


Repeat for the other side of the bag, this time using the panel you are going to use for the back of the bag and pinning the hair elastic (after cutting off the metal part) in the middle of the top edge. Open up the two sides of the bag you have sewn and place one on top of the other, right sides facing. Make sure to line up the lining fabrics and the panel fabrics. Take care pinning all around the bag, making sure the handles are out of the way of the seam allowance. Be sure to line up and pin carefully the edges you have already sewn.


Now sew right around the edge of the bag leaving an opening on the short edge of the lining fabrics for turning and sew backwards and forwards a few times at the beginning and the end, to reinforce the opening.


Trim the excess fabric on the four corners of the bag. Turn right side out through the opening and iron. Slip stitch the opening closed and then push the lining inside the bag, carefully pushing the corners out using a blunt tool (chop sticks are good for this!).
Top stitch around the edge of the bag, making sure the minky handles are out of the way while stitching.


Check the position of the button on the front panel of the bag and then sew  it on the centre top of the bag.


And here is your Small Project Bag with minky handles and some special embroidery, ready to fill up with your latest small project... or two! I used these lovely panels by Cori Dantini and I'm so happy I did because they are absolutely beautiful!


Follow on Bloglovin


Saturday, 8 August 2015

Laminated Fabric Charm Square Trays

We have been sewing some more Charm Square Fabric Trays as they are so fast and fun to make. This time we thought we'd use laminated fabric so you can use the little trays for food too and they are easy to wipe over. This fabric is Remix Slicker Laminated Cotton Polka Dots Pastel, designed by Ann Kelle for Robert Kaufman Fabrics.


A cup of tea, anyone? It's still super hot here in Italy. So if you prefer a cold drink, we know you're not going to say no to macaroons!


The free tutorial for these Charm Square Fabric Trays is on A Spoonful of Sugar here.


Can't resist a pretty polka dot... and tea with macaroons, of course! 


Yesterday we found these lovely jars with a pink lid, made in Italy by Bormioli Rocco. They are so pretty!


They are called Vaso Fido and come in other colours too. They are a great size for storing buttons and whatnots in our sewing room too!


We have a feeling we are going to be getting more of these...

Follow on Bloglovin


Sunday, 2 August 2015

Sunday Stash - Mara's Destash

My lovely friend Mara recently decided to have a destash on Instagram. She lives in Greece with her family and, as you know, the situation there is very difficult at the moment. Her #grexitdestash was a way of making some extra money in case of need.


Her fabrics are beautiful and she was so nice as to make a special bundle for me, as the one I liked was sold in a flash.


She was also very kind to fussy cut two Melody Miller Ruby Star Shining Typewriters I've had my eye on for a long time AND the wonderful Cotton + Steel Black and White Pencils. They are both even better than I expected.


You can find Mara here on Instagram. If you have a moment I would really appreciate it if you could send her some IG love! You can also find her blog here.


Linking up with Sunday Stash over at the one and only Molli Sparkles'.

Molli Sparkles


Follow on Bloglovin