Pages

Showing posts with label The Creative Factory. Show all posts

Monday, 12 October 2015

Handmade Autumn - The Creative Factory

We're enjoying Autumn here, before the Christmas rush starts! Eating chestnuts, walking around local village autumn markets, getting used to the school/sports schedule again! The days are sunny and just a little fresh, perfect Autumn weather. We've even got our Autumn "Bucket List" Mobile out for the season:


We made this mobile last year for a competition. We even won! Here is the post where we explained how the mobile was made.


We love Autumn. OK, we love every season, but there is something cosy about Autumn that makes this time of year so special! We're off to... collect acorns!


This year our friends at The Creative Factory have organised Handmade Autumn and if you'd like to take a look, here are the links to all their projects:


Handmade Autumn by The Creative Factory


Well worth taking a look, there are so many lovely ideas!


Follow on Bloglovin


Wednesday, 9 September 2015

Back to School Linky Party

The Creative Factory invites you to join Handmade Back to School Linky Party with any projects you have created for Back to School! Join our linky party clicking on the link up button at the end of this post, we would love to see what you have been up to!

The Creative Factory vi invita a partecipare al Handmade Back to School Linky Party con i vostri progetti dedicati al rientro a scuola! Partecipa cliccando sul bottone in fondo a questo post, ci piacerebbe molto vedere che cosa avete creato!


Handmade Back to School Linky Party is organised by The Creative Factory and co-hosted by:

Handmade Back to School Linky Party è organizzato da The Creative Factory ed ospitato da:


Adding your project to the party, it will show on all the above blogs! The linky party ends on the 8th of October, so there is plenty of time to join.

Aggiungendo il tuo progetto al linky party, apparirà su tutti i blog in elenco! Il linky party termina il giorno 8 ottobre quindi c'e' tanto tempo per partecipare.


Monday, 7 September 2015

Back to School Treat Banner - Bandiera Porta Regalo - The Creative Factory

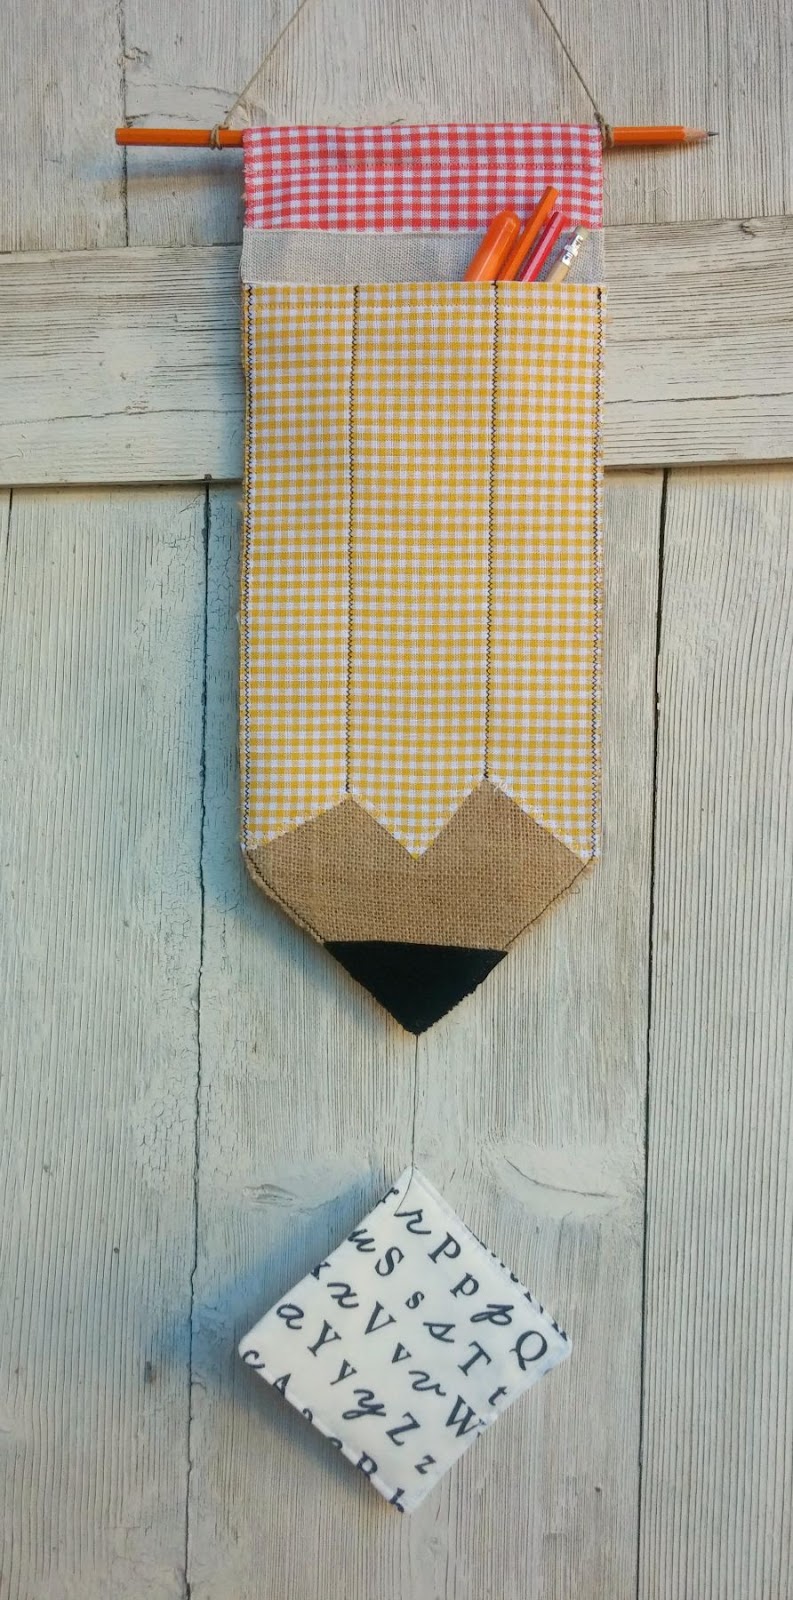
Tuesday is Lucy's first day of Nursery School and she is getting more and more excited! Next week Ella starts school again too so what better way to start the new school year than with a little treat. For the Creative Factory's Back to School series we made a fun banner that is also a pocket to put a little treat inside for the first day of school.

Martedì è il primo giorno di Scuola Materna di Lucy e sta diventando sempre più agitata! La prossima settimana anche Ella ritorna a scuola e allora perchè non iniziare il nuovo anno scolastico con un regalino. Per Back to School di The Creative Factory abbiamo creato una bandiera divertente che è anche una tasca porta regalino per il primo giorno di scuola.


A classic yellow pencil transformed into a banner with burlap, bright gingham and stitched black lines. To hang it up... a pencil. Actually, you must have noticed, there is a trick: we stuck two pencils together to make the right length!

Una classica matita gialla si trasforma in stendardo con tela, allegra stoffa a quadretti e linee nere cucite. Per appenderlo... una matita. Veramente, avrai notato, c'e' il trucco: abbiamo attaccato insieme due matite per creare la lunghezza necessaria!


A "piece of paper" is attached to the banner by a pencil line (a black thread). We used this fun text fabric but it would be nice to embroider/write a message too for your children.

Un "pezzo di carta" è attaccato alla bandiera da una linea di matita (un filo nero). Abbiamo usato una simpatica stoffa con testo ma sarebbe bello anche ricamare/scrivere un messaggio per i tuoi bambini.


Slip a lollipop, a packet of sweets, a pretty pencil or a fun eraser in the banner pocket as a little treat for a happy back to school day!


Infila nella tasca della bandiera un lecca lecca, un pacchetto di caramelle, una bella matita oppure delle gomme carine come regalino per un felice rientro a scuola!


Follow on Bloglovin


There are many fun and useful projects for Back to School by the Creative Factory friends you can read about here:

Ci sono molti progetti divertenti ed utili per Back to School delle amiche di The Creative Factory da leggere qui:

Monday, 27 July 2015

DIY Origami Party - Handmade Summer Nights - The Creative Factory

The Creative Factory is back with Handmade Summer Nights and we thought it would be fun to organise a handmade Origami Party. In this first post you'll find three DIY ideas and tutorials for using paper and fabric origami style!

The Creative Factory è tornata con Handmade Summer Nights ed abbiamo pensato che sarebbe stato divertente organizzare una Origami Party fai da te. In questo primo post troverai tre idee e tutorial per usare la carta e la stoffa in stile origami!


Fabric Origami Crane Welcome Banner
Chinese Noodle Box Party Favours
Origami Cocktail Sticks

Bandiera di Benvenuto con Gru Origami in Stoffa
Scatola Spaghetti Cinesi per regalo
Bastoncini da Cocktail Origami

Fabric Origami Crane Welcome Banner Tutorial
Bandiera di Benvenuto con Gru Origami in Stoffa

Easy to make and a very pretty decoration this Origami Welcome Banner is made folding a piece of white fabric to make an origami crane. We used a 12" piece of white fabric and folded it following the origami instructions for making a crane (just Google origami crane and you will find easy to follow instructions), using an iron to press every fold. You can use starch too to help keep the folds. 

Facile da fare ed è una decorazione veramente carina la Bandiera di Benvenuto creata piegando un pezzo di stoffa per realizzare una gru origami. Abbiamo usato un pezzo di stoffa bianca di circa 30.5 cm e l'abbiamo piegato usando le istruzioni per fare una gru (si trovano delle istruzioni molto facili su Google facendo la ricerca per "origami crane"), usando un ferro da stiro per ogni piega. Si può usare anche l'amido per tenere meglio le pieghe.


We made the banner using some batting and two pieces of fabric placed right sides together (the point is made using the 45° angle on the cutting mat). We stitched all the way round leaving an opening for turning the right way out. We then top stitched around the banner closing the opening. Using a bamboo stick, we folded the top of the banner over the stick and hand stitched it on the back to hold in place. Centering the fabric origami crane, we hand stitched it onto the banner using white thread to keep it in place.  We then decorated the banner with beads, a tassel and a hand stamped tag. 

Abbiamo creato la bandiera usando dell'imbottitura e due pezzi di stoffa, dritto contro dritto (la punta viene creata utilizzando l'angolo a 45° del mat). Abbiamo cucito tutto intorno lasciando uno spazio per rigirare la bandiera. Abbiamo poi cucito tutto intorno vicino al bordo, chiudendo l'apertura. Usando un bastoncino di bamboo, abbiamo piegato la cima della bandiera sopra il bastoncino e cucito a mano dietro per fissarlo. Centrando la stoffa della gru origami, l'abbiamo fissata con alcuni punti cuciti a mano. Abbiamo infine decorato la bandiera con perline, una nappina ed una etichetta stampata a mano.


We love how the origami crane has kept it's 3D quality even using fabric and that's it's carrying the party tag in it's beak!

Ci piace molto come la gru origami ha mantenuto la sua forma 3D anche usando la stoffa e ci piace l'etichetta portata nel becco!


Chinese Noodle Box Party Favours
Scatola Spaghetti Cinesi per regalo

Have you seen these Chinese Take-Away Boxes at Self Packaging? They come in lots of pretty colours and are very easy to assemble. The box includes a cord to use as handles. 

Avete visto queste Scatole per Spaghetti Cinesi a Self Packaging? Ci sono in bellissimi colori e sono molto facili da montare. La scatola ha come accessorio una corda da usare per creare il manico.


We love them! We thought they would be a great gift box for an Origami Party Favour (or even to use as an invitation box to the party!). We quickly put together the box, inserting three wooden beads on the cord to make an extra decoration for the handle.

Ci piacciono così tanto! Abbiamo pensato che sarebbero state perfette come scatola regalo per l'Origami Party (oppure da usare come scatola-invito per la festa!). Abbiamo messo insieme velocemente la scatola, inserendo delle perle di legno sulla corda per creare una decorazione in più per il manico.


We decorated the front of the box with fabric tape (you can use washi tape too) and a closed paper crane.

Abbiamo decorato il davanti della scatola con nastro di stoffa (si può usare anche il washi tape) ed una gru origami chiusa.


These Chinese Take-Away Gift boxes are perfect for party favours. We made origami mobiles to put in our lovely boxes. The boxes are nice and strong, just right for protecting our gifts.

Queste Scatole per Spaghetti Cinesi sono perfette per regali. Abbiamo creato dei mobiles origami da mettere dentro queste bellissime scatole. Le scatole sono belle e forti, ideali per proteggere i nostri regali.


You can find more useful boxes and craft products here:

Puoi trovare altre scatole e prodotti per il fai da te qui:

 SelfPackaging.jpg


Origami Cocktail Sticks
Bastoncini da Cocktail Origami


We love origami cranes so much, we decided to make some pretty cocktail sticks too. We folded our origami crane and slipped it onto a wooden skewer (you can add a dab of glue too). Fast and fun!

Ci piacciono così tanto le gru origami che abbiamo deciso di creare anche dei bastoncini per cocktail. Abbiamo piegato la nostra gru origami e l'abbiamo inserita su uno spiedino di legno (puoi anche aggiungere una punta di colla). Veloce e divertente!


Don't miss all The Creative Factory's Handmade Summer Nights here:
Non perderti tutte le creazioni de The Creative Factory per Handmade Summer Nights qui:


You can find The Creative Factory on Instagram using the tags:
Puoi trovare The Creative Factory su Instagram usando questi tag:

and also on Pinterest here.


Follow on Bloglovin


Sunday, 21 June 2015

DIY Tutorial for Recycled Fabric Vase Covers - Coprivasi for Handmade Summer - The Creative Factory

The Creative Factory è tornata con Handmade Summer. Ci siamo appassionate ai vasi pensili che abbiamo visto ultimamente su Internet. Abbiamo trovato tanti bei tutorial per creare vasi pensili e così ci siamo divertite a crearne con della fettuccia delle magliette super colorata. Visto che il nostro gatto ha lentamente eliminiato (con i suoi salti poco precisi sul davanzale della finestra) tutti i vasi abbinati, anziché comprarne di nuovi (ancora!) abbiamo deciso di coprirli con tessuto maglia riciclato. Ecco allora un tutorial per creare dei Coprivaso di Stoffa Riciclata.

The Creative Factory is back with a Handmade Summer. We have fallen for the hanging planters we've been seeing lately. We have found lots of good tutorials for making fabric hanging planters and so we had fun making our own with colourful t-shirt yarn. As our cat has slowly eliminated (with his not so precise jumping on the windowsill) all our matching vases for plants, instead of buying new ones (again!) we decided to cover our mismatching ones with recycled knit fabric. So here's a little tutorial for making Recycled Fabric Vase Covers.


Ecco che cosa serve per creare i Coprivaso di Stoffa Riciclata:
  • Una vecchia tuta
  • Un vaso per piante
  • Forbici oppure una rotella per tagliare

Here is what you need to make Recycled Fabric Vase Covers:
  • A worn out tracksuit
  • An old plant vase (flower pot)
  • Scissors or rotary cutter

Misura l'altezza del vaso che vuoi coprire e poi ritaglia la base di una gamba della tuta due volte l'altezza del vaso. Taglia via l'orlo del pantalone e poi gira a rovescio.

Measure the height of the vase you'd like to cover and then cut the bottom of one trouser leg twice the height of the vase. Cut off the seam at the bottom of the trouser leg and then turn inside out.


Cucire la base del tubo. Inserisci il vaso dentro la tasca che hai creato e poi segna con gli spilli la stoffa in più sui lati del vaso per seguire la forma del vaso. Disegna una linea lungo i bordi del vaso.

Sew the bottom end the tube you've cut off with a 1/4" seam. Slip the vase inside the pocket you have made and then pin the extra fabric on the sides of the vase to follow the shape of the vase. Draw a line along the edges of the vase.


Togli gli spilli e cuci lungo le due linee che hai disegnato. Adesso pizzica gli angoli alla base e, dopo aver inserito ancora il vaso nella tasca, disegna una linea su questi angoli, seguendo la forma del vaso. Togli il vaso e cuci lungo le linee. Se vuoi puoi tagliare via la stoffa in più, lasciando un piccolo margine.
Gira il coprivaso sul dritto ed ecco il tuo Coprivaso di Stoffa Riciclata. Puoi rigirare verso l'esterno la stoffa che avanza sopra il bordo del vaso perchè aggiunge un bel dettaglio al coprivaso, dato che la stoffa della tuta all'interno è più chiara.

Take the pins out and sew along the two lines you have drawn. Now pinch the corners at the bottom and, after slipping the vase in the cover again, draw a line on these corners following the shape of the vase. Take the vase out and sew along this line. If you like you can cut off the excess fabric, leaving a seam allowance. 
Turn right side out and you have your Recycled Vase Cover. You can turn back the excess fabric at the top of the vase or cut it off. Turning the fabric back on the outside will add an extra detail to the vase cover as the inside of the tracksuit fabric is a lighter colour.


Abbiamo coperto i nostri vecchi vasi con i Coprivasi di Stoffa Riciclata e poi gli abbiamo appesi con le retine che abbiamo creato. Ci piacciono tantissimo! Se cerchi un buon tutorial in italiano per creare retine per vasi pensili allora dai un'occhiata qui (Grazie Carmen!).

We've covered our old flower pots with the recycled fabric vase covers and slipped them into the new hanging planters we'd made. We love the result! If your looking for a good tutorial for making fabric or string hanging planters then take a look here.


The Creative Factory ha preparato tanti tutorial divertenti per Handmade Summer qui:

The Creative Factory has a lot of fun Handmade Summer tutorials for you here:


Happy Summer!


Follow on Bloglovin


Monday, 1 December 2014

Handmade Christmas: Giant Tag Decoration - Etichetta Gigante

I am very happy to be part of the Handmade Christmas event and to join the group of bloggers who form The Creative Factory, organised by Alex Bonetto at C'e' Crisi, C'e' Crisi! One of Alex's wonderful ideas has given way to this event which every day presents an original tutorial dedicated to Christmas, not to miss! I have the honour of opening the month of December with a tutorial to make a Giant Tag Decoration for your house.

Sono contentissima di fare parte dell'evento Handmade Christmas e del gruppo di blogger The Creative Factory, organizzato da Alex Bonetto di C'e' Crisi, C'e' Crisi! Dalla bellissima idea di Alex è nata un'iniziativa che dal 20 Novembre al 18 dicembre presenta ogni giorno un tutorial originale dedicato al Natale, da non perdere! Ho l'onore di fare da apripista per il mese di dicembre con un tutorial per realizzare una Etichetta Gigante per decorare la casa.


Here is what you will need to make the Giant Tag Decoration:
  • Burlap about 13.5x14 inches
  • Christmas fabric about 11x14 inches
  • Scraps of red and white fabric
  • Felt about 16x23.5 inches, about 0.1 inches thick
  • Eyelet about 0.5 inches in diameter
  • Burlap string about 39.5 inches long
  • Ribbon about 16 inches long

Ecco che cosa serve per creare l'Etichetta Gigante:
  • Tela di iuta 34x35 cm
  • Stoffa a tema natalizio 28x35 cm
  • Ritagli di stoffa rossa e bianca 
  • Feltro spessore 3mm, 40x60 cm
  • Occhiello diametro 14 mm
  • Corda di iuta 1 m
  • Nastro lunghezza 40 cm
  • Filo da ricamo
  • Eventuali campanellini, bottoni o altri elementi decorativi da aggiungere

To start, take the burlap and the Christmas themed fabric and sew them together along the 14 inch long side, using a 1/4 inch seam allowance.


Per iniziare, prendete la tela di iuta e la stoffa a tema natalizio e cucitele insieme unendo i lati lunghi 35 cm (il margine di cucitura che uso è il famoso 1/4 di pollice del patchwork, circa 0,65 ma scegliete quello più comodo per voi!). 


Sew the ribbon (in the example I used for the tutorial, I used two different ribbons, each about 16 inches long) along the seam to hide it and to add a decoration to your tag.


Cucite poi il nastro (nell'etichetta del tutorial ho usato due nastri diversi, ognuno lungo 40 cm) in modo da coprire la cucitura ed aggiungere una decorazione alla vostra etichetta.


To make the Christmas ball decoration, cut strips of red fabric about 2x5 inches long and strips of white fabric about 1x5 inches long. Now sew them together, alternating red and white fabric. I used an iron-on adhesive for appliquè on the back but you can do without seeing as the appliquè is quite small. Draw the shape of the Christmas ball on paper and cut it out. Trace around the template and cut out the shape.


Per creare la decorazione della pallina di Natale, tagliare delle strisce di stoffa rossa alte 5 cm e larghe circa 12 cm e delle strisce di stoffa bianca alte 2 cm e larghe circa 12 cm. Adesso cucire insieme, alternandoli, le stoffe rosse e bianche. Ho stirato sul retro una pellicola biadesiva per appliqué ma si può anche fare senza visto che l'applicazione è piccola. Disegna sulla carta e ritaglia la forma della pallina. Traccia intorno alla forma e ritaglia la stoffa.


On the burlap using embroidery thread (without dividing the threads!) write the word you've chosen using cross stitch. I counted 6 spaces on the burlap for every stitch. There are a lot of free words and alphabets for cross stitching on Internet, so you can have fun choosing which to use.


Sulla tela di iuta usando il filo da ricamo (senza dividere i fili!) scrivete con il punto croce la parola desiderata. Ho contato 6 fori nella tela per fare ogni punto della croce. Ci sono molte scritte ed alfabeti con il punto croce disponibili gratuitamente su internet, quindi potete sbizzarrirvi.


Make a template for the tag shape using baking paper, cut it out and fold it in half to check it's symmetric. Draw the shape of the giant tag on the fabric, checking the position through the baking paper. Now place the fabric on top of the felt and tack or use pins to fix in place.


Create un modello dell'etichetta sulla carta da forno, ritagliandola e piegandola a metà per controllare che sia simmetrica. Disegnate il modello dell'etichetta sulla stoffa con una penna cancellabile, controllando la posizione in trasparenza attraverso la carta da forno. Adesso appoggiate la stoffa sopra il feltro ed imbastite oppure fissate bene con gli spilli.


Sew all around the fabric following the line drawn using the tag template. Cut the felt and fabric about 1/2 inch from the seam. Sew around the Christmas ball decoration, trying to stay as close to the edge as possible. Now find the centre of the tag folding it in half and cut a little cross where you will insert the eyelet.


Cucite tutto intorno seguendo il disegno dell'etichetta che avete riportato sulla stoffa. Tagliate ad una distanza di 1 cm dalla cucitura la stoffa ed il feltro in eccesso. Cucite intorno alla pallina di Natale, cercando di stare il più possibile vicino al bordo. Adesso trovate il centro dell'etichetta piegando a metà e tagliate una piccola croce dove volete inserire l'occhiello.


Once you've fixed the eyelet, you just have to fold the burlap string in half and pass it through the eyelet to hang up your Giant Tag Decoration!


Inserito l'occhiello, basterà piegare a metà la corda di iuta ed inserirla nell'occhiello per appendere la vostra Etichetta Gigante!


And here is your Giant Tag to decorate the front door or to use as a fun "place card" for Christmas. You can write the name of your guest to make a "place card" to take home as a souvenir of a special day!


Ed ecco la vostra Etichetta Gigante per decorare la porta di casa oppure anche come simpatico segnaposto a tavola. Basta sostituire la scritta con il nome dell'invitato per creare un segnaposto da portarsi a casa come ricordo di una giornata speciale!


Don't miss the incredible tutorials The Creative Factory is presenting every day. Here are the bloggers joining Handmade Christmas, with lots of ideas from Home Decor to presents:


Non perdetevi gli incredibili tutorial che The Creative Factory sta sfornando tutti i giorni. Ecco le blogger di Handmade Christmas, con tantissime idee dal Home Decor ai regali:

Alessandra di Daisy Garden | Alex di C’é Crisi Bogomilla di Bogomilla Hopp Kids| Barbara di Accidentaccio | Carmen di Lo dico Lo faccio | Daniela diDecoriciclo| Diana Ingrid di Artedim | Emanuela di  My little inspirations | Froda diFroda Creazioni | Giulia di Extreme cera persa Iole di Ai piedi del carrubo | Kiki  e Illy di  Case per la testa Laura di  I colori di Laura | Laura D di A very Laurie blog |Linda di Mami Gio’ | Manu e Flavia di Genitorialmente Mara  di My Icecream Parlour | Marica e Tina di  I fiori di Marica Marzia di La Taverna degli Arna |Nesta e Ella di Ella & Nesta's Little Room | Norma di  Voglio il mondo a colori |Ombretta di A Sunday morning with | Roberta di Colori Idee Creatività | Sara di Il blog di Maryanne | Silvia di Ma Petite Maison | Silvia di Fancy Hollow | Silvia diTine the Lazy | Simona di Me & Design |Stefania di Il castello Incantato | Veronica B  di Le creazioni di Ivy

Handmade Christmas

And there is more! Don't miss the three Linky Parties with ideas and tutorials to make "DIY presents", "Creative Projects" and to find shops for "Handmade presents".

E non è finita! Non perdetevi i tre Linky Party con altre idee e tutorial per realizzare "Regali fai da te", "Progetti Creativi" e trovare negozi per "Regali fatti a mano"


Follow on Bloglovin